Ingredients:
Dough:
- 550g boiled/steamed potatoes
- 150g all-purpose flour
- 80g sugar
- 2 yolks
- a pinch of salt
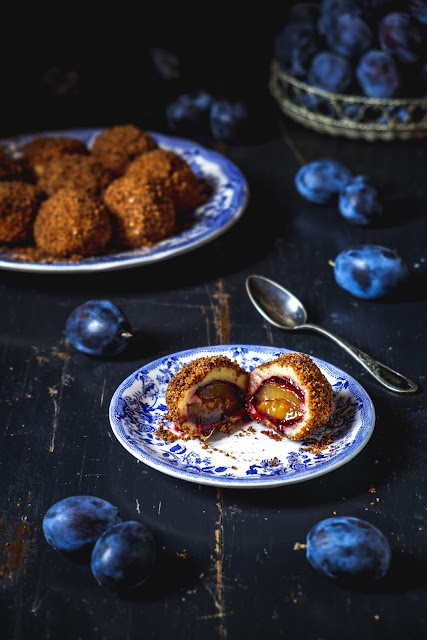
- 20 small plums
- 40g sugar
- 1 teaspoon cinnamon
- 150g breadcrumbs
- 60g butter
- 60g sugar
- 1 teaspoon cinnamon

Directions:
- Prepare the plums by cutting them only on one side to remove the pits. You should not cut them in halves completely, the 2 parts need to stay together to maintain the integrity of the plum.
- Add over the sugar and cinnamon and stir the plums with your hand. Set aside.
- Prepare the coating by melting the butter in a pan and adding the bread crumbs.
- Toast the breadcrumbs on low heat and stir until the colour is a beautiful light golden brown.
- Turn off the heat and add the sugar and cinnamon, Set the pan aside and let's start the dough.
- For the potatoes, I prefer to peel them first and steam them. Smash or grate the potatoes (without peeling obviously if you chose the boiling option)
- Add over the sugar, yolks, flour and salt and mix. You should be able with all these ingredients to form a sticky dough using your hand. If it feels too wet, you may add one extra tablespoon of flour. It is not recommended to use a mixer at this stage to avoid gluten formation and because the dough will turn too elastic and very sticky.
- Portion the dough into 35g balls. This is the quantity needed to cover the plums.
- Dress each plum with the dough from a ball, sealing well the dough around. Repeat this for all the plums.
- Boil 2-3 litres of water in a pot and add 10 dressed plums using a slotted spoon.
- Let them boil on medium heat until they float, then remove them to a plate. Put the second batch of plum balls to boil in the pot while we are coating the first batch.
- Roll the hot dumplings in the toasted breadcrumbs until they are completely covered. Proceed in the same way with the remaining plums.
You can serve them warm or cooled.
Recipe inspired from here.