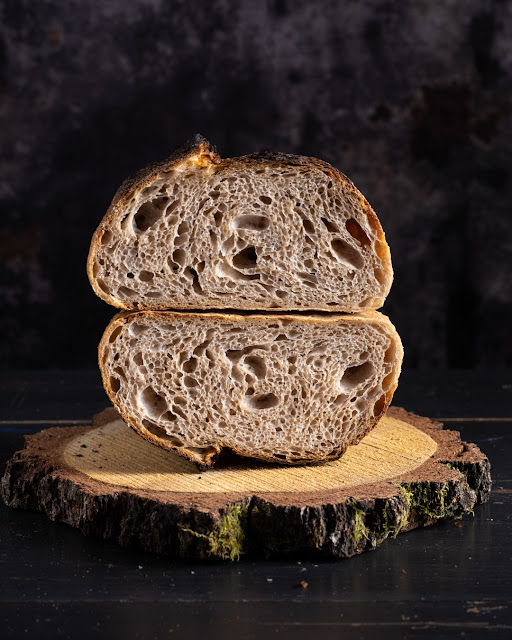
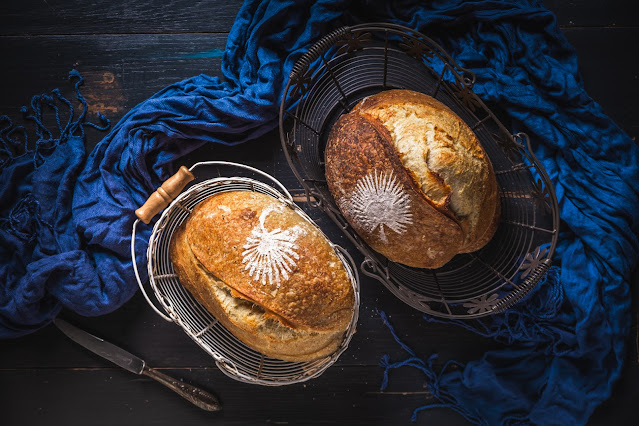
I need to confess that I have a love-and-hate relationship with open-crumb sourdough bread. While I am super excited when I cut it and see these lovely big alveoli and feel proud that I managed to catch the fermentation just at the right moment, my excitement goes lower when I agree with my daughter saying "mommy, there are too many big holes in this slice for the butter to stay!" To this practicality issue, no argument that "it is the best fermented bread" and that "I mastered the process" does not stay up.
Bread is not only about the size of the holes inside. There are many aspects to consider like health, taste flavours or the purpose for which it was made.
To be honest, I did not plan for an open crumb. What I was up to was to track the ph and make the correlation with the degree of fermentation. I used to believe that the best time to shape the loaves was between 4.2 to 4, with higher chances for open crumb on the lower side. The type of flour is a variable that intervenes in the process too and I was fully aware of that.
I made 3 changes in my classic process for this bake and now I do not know which one had the major impact. Therefore, with my next bakes, I will need to isolate the changes, one by one, to identify the major one.
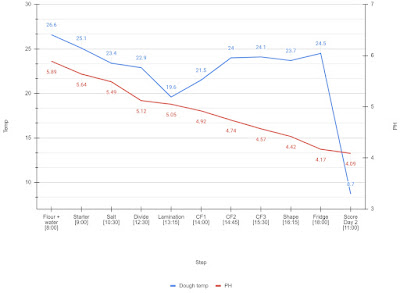
First, I proofed the dough at a higher temperature. Or at least this is what I thought when I set my bread proofer at 32ºC. This was tricky because my kitchen was cool (~17ºC) and every step influenced the temperature of the dough which fluctuated between 19-27ºC.
Second, I changed the starter. I have a second starter derived from my classic wheat starter but fed with rye. I usually keep this one in the fridge and take it out once or every 2 months to feed it. I recently read a book where the baker was saying that in his bakery he uses only rye starter regardless of what bread he was targeting. I was intrigued and wanted to give it a try.
The third was the ph value at shaping. While I was waiting for the dough to pass the 4.2 ph mark before shaping, I had the feeling I needed to shape it earlier as my eye on the dough was rushing me for the shaping step. Without a ph meter I think I would have shaped the dough somewhere between the coil
fold set 2 and 3. But I resisted, thinking... scientific measurement might be more precise than my eye. Even more, after shaping I kept the loaves in bannetons until reached the 4.2 level and just after, I put them in the fridge.
The next day, before the bake, I measured again the ph and I had a significant drop to 4.09. Interesting that too, because most of my loaves were going into the oven between 3.9-3.8.
What an adventure! And I am so keen to test more on this recipe. There are very few adjustments I would make to it. For example, I would put it in the fridge just a bit earlier hoping to get taller bread and maybe a more uniform distribution of the alveoli. And maybe keep it more in the fridge?
I feel that the rye starter gave tremendous power to the yeasts and bacteria and they produced an impressive amount of CO2 to pump up the bubbles early. I will use again this starter, I have a good feeling about it now.
As for the temperature, I'll test keeping it high to see the influence on behaviour and taste. Now, during the cooler time of the year is also justified to keep those microorganisms happy.