RSS

50% Semolina Sourdough Bread


Semolina is my new obsession. I knew about semolina since I was a child and my mother was making milk porridge with it. It was one of my preferred breakfasts. Little did I know that it will later become one of my favourite ingredients for bread.


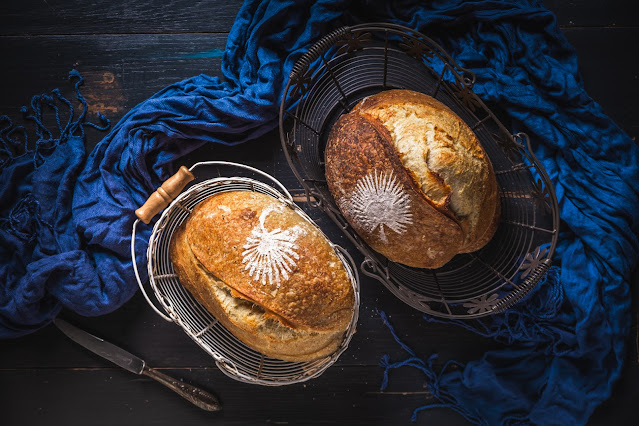
To make fantastic sourdough bread with any kind of flour you need to understand its characteristics.

Semolina (or semola rimacinata di grano duro) is made from hard wheat not from the common wheat usually used for bread flour. Semolina is very popular for making pasta, couscous, and porridge but it can be successfully used in bread as well.

Semolina has a coarser texture than classical flour but should not be confused with rice or corn semolina. Semolina comes from durum triticum wheat and when ground in a coarser texture is called semola rimacinata. If it is further ground to a very fine texture, it is called durum flour.

Besides its texture, semolina has a pale yellow colour, has a more earthy aroma and it is rich in proteins but forms a low-quality gluten. This makes the dough less extensible and affects its structure.

However, there are some tricks that you can apply to overcome this issue.

  • First, you can improve the structure by adding strong bread flour into its composition and this is exactly what we'll do today.
  • Then, you can make a longer autolyse of 2-3 hours to develop the gluten to its maximum potential.
  • or you can increase the mixing time too for the same goal.

I invite you to watch the video of this bread to learn more tricks about it.


Nettle Aloe Vera Shampoo bar (version 2)


This is the second version of the Nettle Aloe Vera Shampoo bar and the last one in the series of recent soaps/shampoos.

Compared to the first version, this one is made in 3 layers (for decoration purposes) with rosemary, cedar and lavender essential oil. Made only with fantastic oils and butter for your hair, enriched with vitamin E.

Autumn soap

 Sometimes, when verifying the pantry I find some stuff stored that I should better use before expiring. This is the case with some special oils and butter. This soap has some interesting oils inside (avocado, coconut, grapeseed) and is flavoured with cinnamon and cloves essential oils. Almost sounds like autumn right? In one month we will be there ...

Nettle Aloe Vera Shampoo bar

Maybe once or twice a year I make my own cosmetics. My affair with homemade soaps and shampoos started some years ago when my childhood friend taught me how to do them. Since then I only use homemade staff.

Solid shampoo bars are my favourite because I can customise them to what I want. They are all natural and made by my own hands.
Recently I have done 3 types and I will share them here with you.

Tart Tatin in the style of Wiliam Lamagnère


I am rarely highly impressed by recipes but this one was a love at first sight. The idea of rolling the apple sheets is brilliant not only from the practical point of view but also from the way it looks.
I'm sure that everybody made an apple tart at least once in life as it is such a common desert and I thought I cannot be any more impressed. But this one, first is a French-style apple pie, known as Tarte Tatin, usually made with caramel sauce and turned upside down after baking. Second, it has such a special design that you'll rarely see entering a classic pastry shop. Third, although seems fancy and complicated, it is super simple in terms of preparation and the number of ingredients used.
What was more complicated to figure out was how to cut the apples into such long sheets. Cutting them by knife is almost impossible. Using a potato peeler maybe can help a bit but it can be frustrating. You need a special cutter for them. The French chefs know this cutter well to create all sorts of fancy fruits and vegetable decorations but the price for one is way too high for a simple home baker like me. I found however a cheap plastic alternative (compared to full metallic French versions) with a good blade. How long this will be working well, we'll see, but for its first usage did its job perfectly and I am happy about it. However, I am not sure how often I will use it in the future.

I was mentioning earlier its simplicity. This tart is about a puff pastry sheet, apples and a caramel sauce made from sugar and butter. It takes longer to bake properly (about 2 hours) and it needs to rest for at least 4 hours (or better overnight in the fridge) to set properly. Yes, it takes a long duration but there is not much work time consuming for the baker (assuming you have the right tools to make the apple sheets).

Now that I tried it, I feel I want to do it again and my imagination has just opened to lots of new designs.

The tart itself is wow just the way it is. If you haven't tried it before, I highly recommend it. The taste is fantastic and deep. It is sweet but not extra sweet. I think that sugar can be even more reduced and still keep it delicious.


Lavender Cake

Lavender is such a beautiful plant to grow in your own garden! When the flowers are blooming the life turns to a blue-violet color.

It is not the first time I use lavender in cakes, I've done Lavender Muffins and I loved their subtle flavour and aroma. Here I come now, with a little cake that turned out to be a great success as my kids loved it from the moment they've seen it. It was difficult to keep it for myself for some time just to film it and photograph it.

Rhubarb - Plums Tart

Oh no, not rhubarb again!
Last year I bought a little rhubarb tart and plant it in my garden. It grew up bigger the previous summer then, it almost disappeared during the winter. I knew that it should be harvested starting the second year, so I waited patiently. This early spring it grew up big, very big and I harvested it now for the 3rd time. This is how, here is the third rhubarb tart I make this summer! I took 2 big stalks, but not enough for a big tart, so I had to complement it with something else. I had in the fridge some very very sour plums, almost impossible to eat. It was the perfect element to add near the sour rhubarb in my tart. 
I planned to fill it in with my classing almond filling. But oops... I only had 70g of almond powder left. What to do? I added coconut flakes instead. I think this is the way we all do (don't tell me otherwise as I won't believe you), we replace things in the recipes that we miss. Unless you plan very well in advance you need to improvise, but improvise wisely with things that can work. 

Red Berry Cheesecake in Instant Pot

I do not know why, but I was always afraid of cheesecakes. Not to eat them but to make them. They crack, they are runny sometimes, and there are multiple ways you can get it wrong with a cheesecake. Well, the Instant Pot opened a door for me. I hated the classical way of putting water on a tray and putting the pan inside a classical oven. What if the pan is not leakproof? Then, handling a hot water tray is not very pleasant. With the Instant Pot, things are simpler and with fewer negative surprises. But this is not a commercial post for the Instant Pot, it is just my opinion. You can definitely bake this cake in a normal oven, too.

I made this cake in 2 versions, one including milk (or sour cream) and one without. The first one leads to a more creamy texture and the second one is more crumbly. The first one is soft, and the second is drier. I liked them both but my daughter detests cream texture in any cake. You can guess then which one was her favourite. 

You can do this cake without the fruity layer but it adds a full dimension to the taste of this cake. The first version I made was with strawberries, and the second was with raspberries. Both are exceptional and red berries are just an idea, you can use any fruit you want!

Sugar in this cake is kept to a minimum but it is just enough to enhance the taste of the cake. If you prefer very sweet cakes, feel free to add as much sugar as you like. Personally, I like cakes but I also like to stay on the healthy side of eating. Most of the time I do not eat the cakes that I make, they are for my kids but if I really want to eat a slice I would choose one that is the most appealing to me and this one was irresistible.

I hope you will like it too...

Instant Pot Cranberries Yoghurt Cake

I love baking in general, but steaming was not necessarily my daily way of cooking. I challenged myself to try pressure cooking lately and a whole new world opened to me. In fact, cooking with pressure was not a new thing for me. My mother gave me a big pressure cooker pot as a present at my wedding. I need to recognise it was a love and hate relationship... I was using it for a while then it was staying for months on the shelf. Now that I think back, I think the main reason was the practicality of that pot.
So, two lovely ladies told me about their experience with the Instant Pot and I convinced myself I want to try it. I can say it was a real turning point in how I am preparing my daily meals. In a short description: healthier and faster. I added as well to my family meals new dishes that looked so complicated before. Now everything happens in one pot...
I love to explore, to test the limits and I tried to bake cakes in it also. I understood what works in it and what is not. Instant Pot cooks with steam and moist types of cakes are appropriate. I baked a classic bundt and turned out OK but it was too dense for my taste. Then, I tried a creme caramel and worked perfectly. This time I made the yoghurt cake with a recipe from my mother. Of course, I had to adapt certain things but I am happy with the result.
This type of cake is usually baked in the oven between filo pastry sheets. I used a biscuit layer instead. I replaced raisins with dried cranberries (to be more accurate I think the ones that I have are actually lingonberries - in French is "airelles", please correct me if I am wrong).
What I love about it is that it is super simple to make it and it is firm enough to keep a slice on your hand and walk away. I gave it also to my kids at school as a snack.
You can play with some decorations and it will look as fancy as you wish.
If you do not have dried cranberries, use raisins or any dried fruits. I haven't tested but I think it works perfectly with fresh berries also. Good idea, I must try this too, could be very interesting.
This cake can be called a pudding. It works with the same principles, a cereal that expends in a diary liquid. What is special though is that I use homemade yoghurt, not milk. Almond essence and lemon zest give a specific and fantastic aroma to this cake.
It will for sure enter into my regular bakes due to its simplicity and delicious taste.

Here are the ingredients...

Rhubarb tart


Last spring, I've bought from the weekend market a little plant of rhubarb. It was a small plant and the guy selling it to me has warned me that it could grow up to 1m in diameter. All OK for me, I planted it in my garden and started to grow: unexpectedly big up to 2m in diameter at least. I knew that in the first year I better not harvested it, so I waited calmly for this year to come to taste it. Over the winter, it almost completely dried and I thought I lost it. But when this spring came, it was growing again at least as big as last year. This time... I had in mind a tart and now was the right moment.
A simple tart but with a lot of new things for me. First, it was about baking something with my own grown rhubarb. Second, it was my first tart baked in the wood-fired oven. None of these I've done before. The oven was low in temperature after a previous bake so I can almost say I did a slow bake. It started somewhere at 190ºC and went quickly a bit lower than 130ºC. I can call it a slow cook almost as it took about 3-4 hours to finish it and that with the tart shell already pre-cooked.
I was expecting the stalks to be redder but the lack of sun and good weather of this year had for sure an impact. Nevertheless, I had to try it!
The tart was incredibly well received by my daughter who enjoyed the sweet-sour taste of it and she commented that remembers the three kings' cake. Of course it does, as the filling is very similar to that cake, being based on almond powder. Just when it was gone I realised that I did not save a piece for me to try. Well, the plant is still there with big leaves but I won't dare to cut more stalks to not kill the plant. So for me, the next attempt to taste it will be next year.
Here is the simple recipe.