RSS

Black sesame rye sourdough crackers

My kids love food that crunches between their teeth. I always have at hand for them some "cracotte", sticks or even dried bread.
As this pandemic time put me to stay at home, I launched myself into a more advanced bread journey and that means that I keep my starter at room temperature. Well, actually my starter stays on top of my wifi router because there I have constantly between 25-30ÂșC. I hope that the internet provider will not change soon the wifi router type otherwise I'll need to improvise another "home place" for my precious Maya sourdough :) . When keeping the sourdough out of the fridge you need to feed it. And mine is such a gourmand ! At the wifi router temperature it eats 3 times a day in proportions like 1:4:4. You can imagine then that every week I gather a lot of discarded sourdough starter that pushes me to bake something with it. I search for different recipes on the web, I adapt them and go to the kitchen to make them. This time, the source of inspiration was a recipe that I found on a brand that I love, although I never had the chance to have in my hand one of their famous flours.
As always, I bring to any recipe my personal touch, and my contribution for it was the rye sourdough starter and the black sesame seeds. These 2 come with a specific flavor.
I baked these crackers during the day when my kids were at school. When home, their eyes jumped straight on them. You can imagine that I lost the battle of convincing them to eat before crunching. But in the end, this is healthy homemade food, so why not.
When I saw the recipe I was thinking that it will take me some time to do it, but actually it was much quicker than expected. 
This is how, I am pretty sure that now I have a new recipe on my regular baking wish list of my kids.

Ready for a crunch session? Have a look on the recipe bellow.

Plum cake

I have the feeling that the plum becomes a forgotten fruit. During my childhood, my mother used to prepare this fruit in all sorts of ways. She was making compot, jam, cakes (ohhhh and I remember the famous plum dumplings... maybe I should try those ones as well) and we were eating them fresh as well many times. Nowadays, I do not see the same popularity for this fruit anymore and it is a real pity.

Because I miss so much seeing my parents during this pandemic times, a lot of memories are coming back to me and plum cakes is one of them. Before coming up with this recipe I consulted my mom to be sure that this is a similar recipe with the one she was doing when I was a child. In Romania, it is another type of plum that is most used. That type is smaller, bluer, sweeter and more oval. The one that I find here is big, round and red. Nevertheless, I tried my luck with this type in a very simple recipe.

Yes, it is the taste that I remember... these fruits leaves a lot of juice in the cake and make this simple cake a delicious dessert. Here it comes, my recipe for the plum cakes, exactly as I remember it from childhood.

Pain demi-gris

While visiting a local farm I saw an organic flour that was labeled as demis-gris. As I was curious about it and it looked so tempting, I bought a bag of 5kg to test it. I nicely placed it on a shelf and there it remained for couple of months. While cleaning the kitchen, I found it back and I was determined to give it a try.
I was oscillating to combine it with some strong flour but finally decided to use it in its pure form so I can see its behavior during handling the dough and later to see its original aroma.
Honestly, when I bought it, I had no clue what demi-gris is. With a bit of research afterwards, I understood that it's a combination of whole wheat flour and white wheat flour. I am still not 100% sure that this is what French and Belgian people call demi-gris, but if there is somebody to enlighten me about this type of flour s/he will be more then welcome to leave me a comment. No idea if it is a 50-50% proportion but the important aspect is that it is organic and this qualify the entire bread as being very healthy.

So, I started with low expectations as whole wheat flour is one of the most difficult type of flour to work with. I've done many breads before with the main ingredient being the whole wheat and I knew that whole wheat gives a more dense crumb. No matter how dense the resulting bread, it was always very tasty. With that said, airy or not, what I was ready to bake was a tasty and healthy anyway.
I followed my new method of baking that includes autolyse, lamination and coil folds. Because I knew the wheat flour requires more time to hydrate, I opted for an overnight autolyse. After kneading, the dough was less elastic than when using a strong white wheat flour, but this was not at all unexpected.

I was worried about the lamination phase. I didn't know if I would be able to stretch the dough and how much. Well, here I was actually surprised that I could laminate the dough nicely in just a bit smaller rectangle than usual. 

I baked the dough and I was satisfied with its outside looking. But the most impresive part was revealed after cutting. The crumb... oh the crumb was beyond any expectation: soft, airy, elastic and with such a mesmerizing aroma...

I put the bread on the table for dinner and sliced half of it. This sliced half was completely devoured by my children. Maybe I do not know exactly what this demi-gris flour is, but for sure there is something magical about it ...

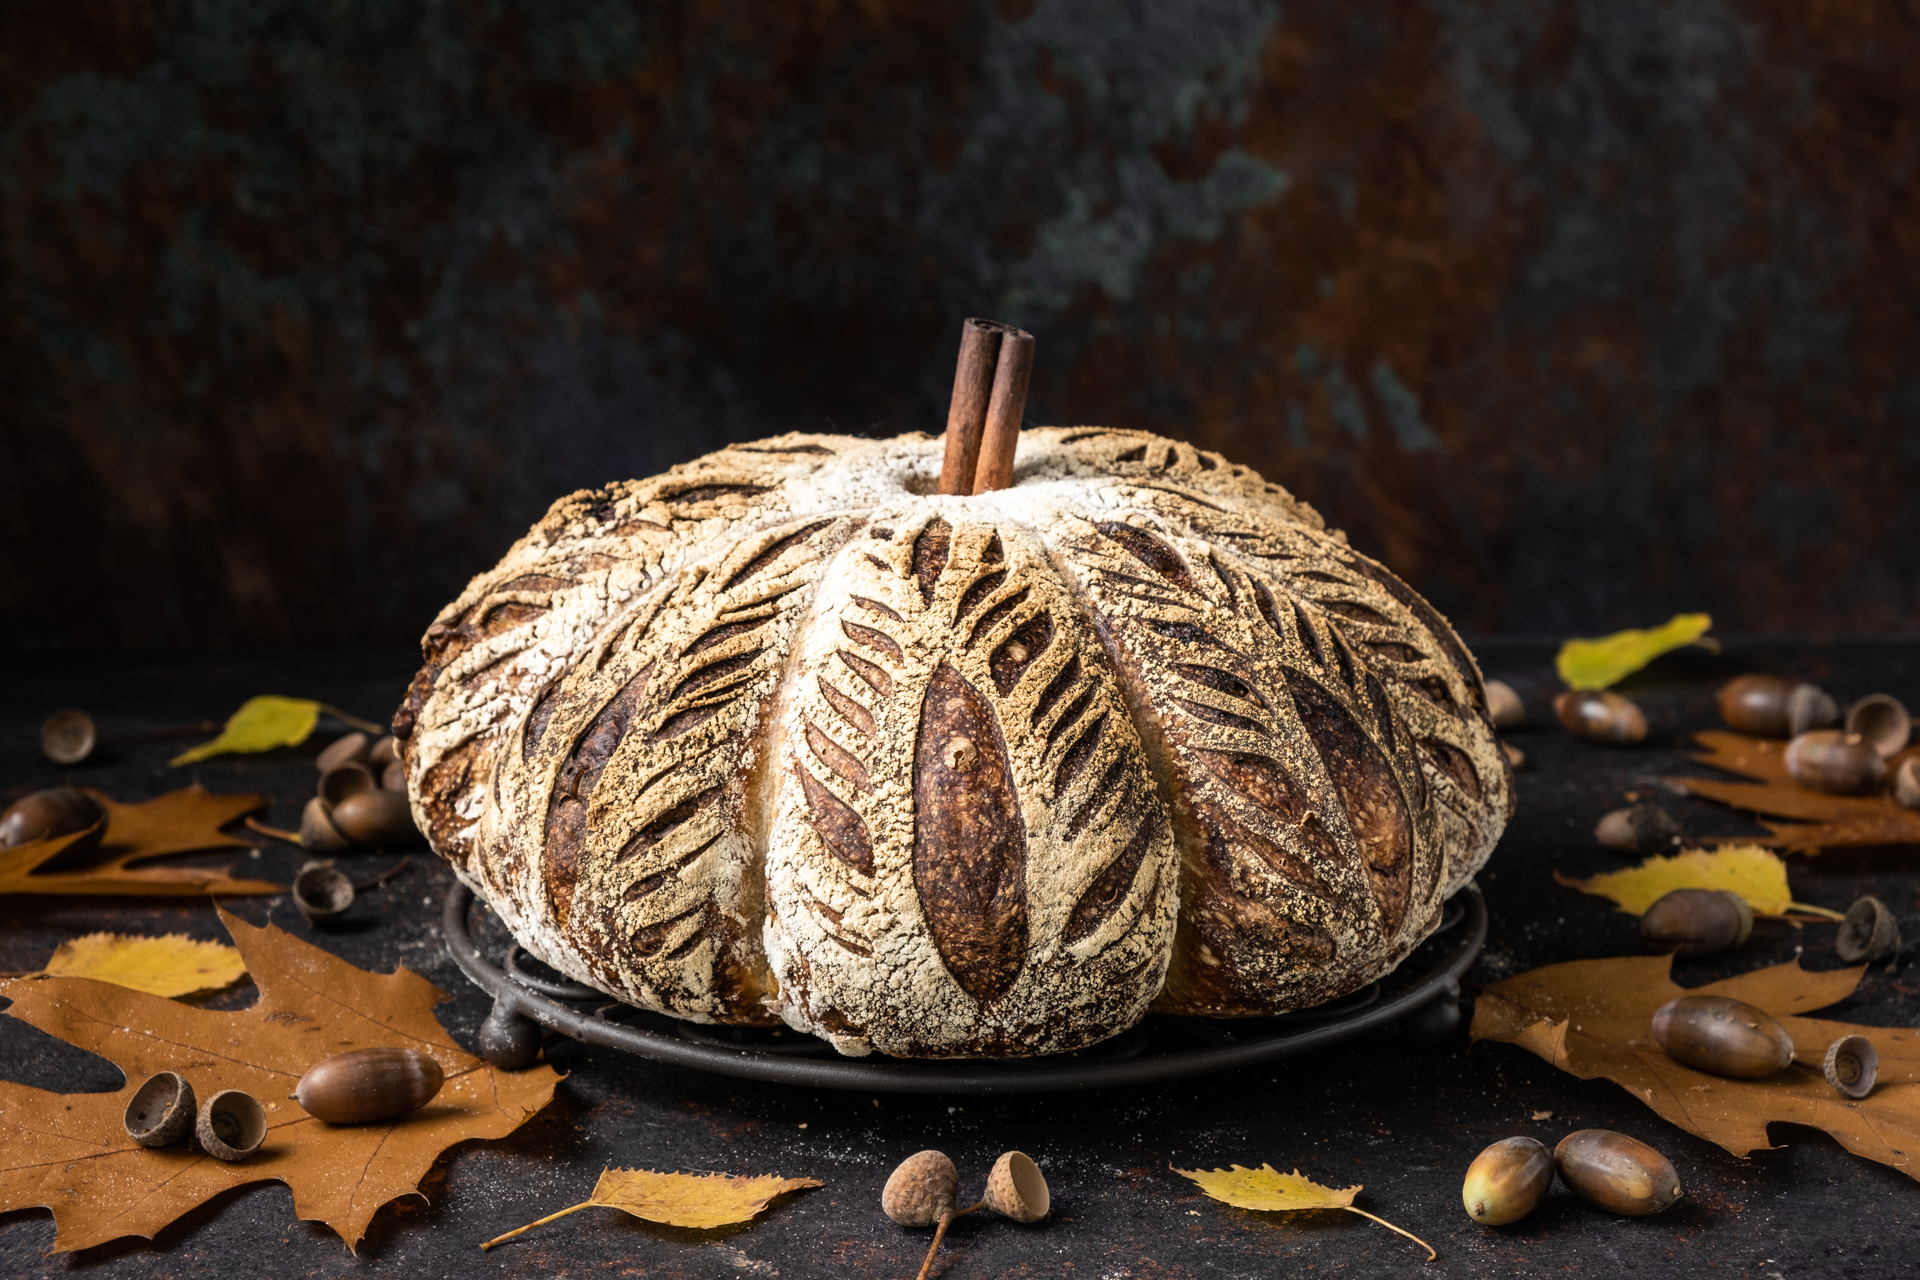
Pumpkin Sourdough Bread

October is the month of the pumpkins. It is the time when you put some wood in the chimney and gather the family around the fire for the first time in the cold season. Autumn comes with small changes in the diet as your body requires more calories to keep itself worm. But autumn is well known for its specific fruits and vegetables and pumpkin is one of them. Orange or yellow, they start to pop up in every house on the table or just in front of the house as a decoration to prepare the classic Halloween holiday. We make pumpkin pies, pumpkin soup and why not, pumpkin breads.

This is a recipe for a sourdough bread made with pumpkin puree and pumpkin seeds.
It is a very delicate bread, with soft crumb and combined aroma of pumpkin and cinnamon. It is not a cake but a delicious bread.

85% Hydration Sourdough Bread


This one is probably one of the most hydrated bread I have ever tried. I did it multiple times just to be sure that I was doing it the right way. I did it with a mixer or by hand, I baked it in the conventional oven or in the wood fired oven. Every time, the result was similar. Although very hydrated, I was impressed about how easy it was to work with the dough despite the high hydration. The challenging part of this bread was the dough structure. With so much water inside, it was difficult to create a dough that was standing by itself. I still need to practice this part but so far I am not ashamed of this result either. For sure, there are parts that I can improve but for the moment I am happy with what came out of my hands.
The taste, texture and flavor of this bread were every time outstanding and they convinced me that this is a great recipe. Not for beginners, as requires a bit of practice, but for sure I'll do a similar hydration in the future.

Here it is also the video of the recipe:

Sourdough waffles

This is the most efficient way to get rid of your discarded sourdough. It is quick and easy to make and it is only based on your discarded sourdough (meaning no extra flour is added). 

I keep my sourdough at room temperature and after 2 feeds daily at the end of the week I fill my jars with discarded sourdough in the fridge. I basically collect 120-150g of discarded sourdough every single day. By the end of the week I have a considerable amount and is out of question that I would through away such an amazing ingredient. 

Lately, I used this discarded sourdough for baking these waffles. I did this recipe multiplied by 2 or even 3 times, depending on the amount of discarded sourdough I have available in the fridge. But this is just the basic recipe and can be adapted to the quantity of the available sourdough.

The raise of the waffles is due to the baking powder and not due to the sourdough. The discarded sourdough has barely few activity in it when kept in the fridge. And more, this is discarded sourdough, meaning that the sourdough raised already at peak and the bacteria consumed the sugars from the starch already. You may try to bake waffles with fresh sourdough and without baking powder but my point here was to use the discarded sourdough, not to create sourdough especially for baking these waffles.

Every time I did this recipe, I saw the bottom of the plates very very quickly. They melt in your mouth and my children love them. The sugar in the composition is kept to minimum for healthy reasons, but if you like it more sweet, you are free to add more sugar.

Just give them a try if you have some discarded sourdough. If you do not have, just bare in mind that the sourdough (at 100% hydration) is 50% water and 50% flour and you can, at any time, replace sourdough with water and flour for this recipe.

The taste of these waffles is not sour as you might think when reading this recipe. The sourness disappears through the baking leaving you with a great taste and texture. 

Well, go to the kitchen, make this recipe, call the kids to eat them and let me know about their reactions :)

Bunny cake


When I have a special occasion I know I have to do a cake. There are a few days per year when I challenge myself to try a new type of cake. This time the occasion was a special one, my daughter turning 8 years old. When I asked her what kind of cake she would like, I somehow hoped that she would answer a doll cake, as I already did some similar ones before. But no, she decided on a bunny cake. No, it is not an Easter cake (although would it could fit also for this), it is a birthday cake. 
My challenge was then to do an animal cake for the first time in my life. Bunny she wished for, then bunny should be.
I went for a simple version, without complicated 3D layers for decoration. This is a big cake made from 2 sponge cakes that are cut in such a way that they look like a bunny. And when I say a big cake, I mean an almost 4kg cake that can be cut into at least 30 portions. 

During my baking cake experience over the years, I tried to avoid as much as I could to make very sweet cakes. But for this time, I wanted to try myself some classic recipes that I avoided so much over the years due to a high amount of sugar and butter inside. 
A simple calculation with the total amount of sugar is 150g of sugar for each sponge cake, 600g for the cream, and 1kg from the sugar paste. That is a total of 1900g of sugar! Yes, there are 2 cakes made here, so we should divide this by 2, meaning that the amount for one cake is 900g. As well, if you calculate the butter, it arrives to 450g of butter per cake. Still way to much sugar and butter in a cake for me. My daughter wanted absolutely a cake covered in sugar paste, but this is totally optional. The consistency of the cream is perfect to decorate the cake so, honestly (unless of a special request), the sugar paste is not needed.  Now well, my daughter is turning 8 only once in her life ... and such a sweet cake is not something that she eats regularly. 

Making this cake took some time. During the day I have other duties, I spread the work over 3 days. The first day was the sponge cakes baking. You can well do this in advance if you keep it in the fridge. The next day, was the preparation of the Swiss buttercream and the last day was for decoration activities.


Indeed, this might not be a healthy dessert but there are some interesting advantages for the one who is preparing it (meaning me :) ) 

Swiss buttercream is a real pleasure to work with. It is smooth, silky, consistent and I cannot describe it better. Its secret is the big amount of butter that enters inside, It is the butter that makes the cream so silky. This specific cream requires that you cook the egg whites in advance like you do for meringues. You need to cook them before they will be mixed with butter.


Needless to say that when I put it on the table for the birthday party of my daughter, her best friends were amazed and the atmosphere was full of woooows! When put on plates to be served, the sugar paste was eaten first. My daughter, who is very picky about the creams that I put between the layers of the cakes really appreciated the silky and sweet part of it. In the end, my daughter was happy with her birthday cake and that is what matters for me the most.

First easy sourdough bread

As I am very often asked how to start making bread with sourdough, I will show you how to make your first sourdough bread, explaining in detail the what, the how and the why of every step of the sourdough bread making.  

Let’s start first with, WHY to bake sourdough bread? Why is sourdough bread so special? The answer is simple, because it is healthy, tastes and smells incredibly.

Unlike the yeast bread, sourdough bread requires more time and its making spreads over several hours or even days. The sourdough bacteria needs time to eat the sugars in your flour and this works also in your advantage in order to develop amazing flavors and to make more digestible and healthier bread. 

Sourdough bread making has the following successive phases: 

  • First, is the flour hydration, in a phase called autolyse

  • Then, when the sourdough starter is added, starts another phase called bulk or first fermentation

  • Then it follows a second phase of fermentation, known also as final fermentation that starts after the bread is shaped.

  • Then is the baking and

  • In the end, you let the bread to cool at room temperature.

The entire process takes almost one day, starting, lets say, Saturday at 2pm and putting the bread on the table for the Sunday’s lunch. However, only 30 to 45 minutes in total you’ll need to effectively dedicate from your time to make this bread.

Sourdough focaccia

I made a lot of types of bread but foccaccia is one of them I haven't try so far. 
With the purpose to have fun with the kids, I gathered my son and daughter in the kitchen and start playing with ingredients. Of course, the dough was already prepared, so I gave them 2 trays and 2 dough. It was fun for them to deep the fingers into the dough that was really wet. Then, the artistic arrangement came naturally. No inspiration from somewhere else. I just explained them that we need to make a painting out of the ingredients and the imagination opened its wings.
First one, on the top, was done by my 3 years old son, with just a little help from my side. Second one was fully the work of art of my 7 years old daughter. The entire activity was so much fun and we spent such a great time together. In the meantime, my husband prepared the wood fire in the oven and, in the end, we baked the 2 focaccia inside. It was tricky to know how much time was needed for the baking but finally they turned out to be just perfectly cooked.
Mmmmmniam.
An experience that for sure I'll have to repeat.

White Sourdough Bread


When you target a high hydration loaf (and this one is 80% hydration) you need to have a bit of understanding about how the dough behaves and what you need to do. I did high hydration loaves before and they were a total mess. They almost all finished in a bread pan to avoid having a flat bread on my stone.
But the dough handling is a continuous learning process. You learn specific techniques and the dough behaves much better. These techniques must be applied by yourself many times in order to develop the right skills and the right eye.
Although I bake sourdough breads for more than 6 years, I still feel myself a novice. And yes, during these years I made tasty and beautiful breads. Did I take out the best flavors from the flours? Did I raised them to their maximum potentials? Probably not, but I learn with every single bake. And you know that feeling, you feel today smarter than yesterday.
Yes, this is an 80% hydration dough and I honestly say that I didn't feel this at all. With a good strong flour, with a proper autolyse, with the right kneading and folding techniques it looks like a piece of cake. This challenges me to try an even higher hydration dough, and I know that one day I will try again my limits.
For the moment I enjoy this lovely bread made with my own hands ....